The employee onboarding form is the single most overbuilt document in HR. Most companies run day-one paperwork as a pile of PDFs, a spreadsheet for IT, an email to payroll, a Slack message to the office manager about desk and laptop, and a separate policy-acknowledgement attachment that nobody ever signs. Eight hand-offs, five tools, ninety minutes of new-hire time, and half the data ends up re-keyed into a system that could have captured it directly. This guide collapses all of that into one employee onboarding form, field by field, with a Good Form template you can clone in five minutes and ship before your next new hire's start date.
We'll cover the five sections every day-one form needs, the fields inside each, the legal and payroll essentials most companies miss, how to phrase policy acknowledgements so they actually hold up, and a downloadable template at the end. If you want to skip the reasoning and go straight to the form, there's a Good Form starter you can clone here.
The short version:
- One form, not eight. Five sections: personal, tax and payroll, emergency, equipment and access, policies and sign-off.
- Collect everything async before day one. New hires fill it from home the week before, not sitting in reception.
- Separate "capture" from "verification." The form captures data. You verify I-9, right-to-work, and signed contracts in person where required.
- Policy acknowledgements need checkboxes per policy, not one catch-all. A single "I have read and agree to all policies" is a soft signature.
- Clone the Good Form onboarding template → and ship it today.
Why the Employee Onboarding Form Matters More Than People Think
Most HR teams treat day-one paperwork as a compliance checkbox. It's actually the first operational interaction the new hire has with your company, and it predicts a disproportionate amount of early attrition.
Gallup's long-running onboarding research puts this bluntly: employees who describe their onboarding as "exceptional" are 2.6 times more likely to be satisfied at work, and organisations with structured onboarding retain 82% of new hires, versus a markedly worse rate for those without. The paperwork itself is only part of the experience, but it's the most visible part, and the easiest to fix.
Here's the pattern most companies fall into:
- Offer letter goes out via one system (often DocuSign or an ATS).
- Tax forms go out as PDFs via email the week of start.
- The new hire shows up on day one, sits in reception, fills in paper forms.
- IT gets a ticket an hour later asking for a laptop that wasn't provisioned.
- Payroll gets a Slack message asking for the tax form details the new hire wrote on paper.
- Two weeks later, someone realises the policy handbook was never signed.
Every step of that is fixable by collapsing the whole thing into one async form the new hire fills out from home, three to five business days before their start date. That's what the rest of this guide builds.
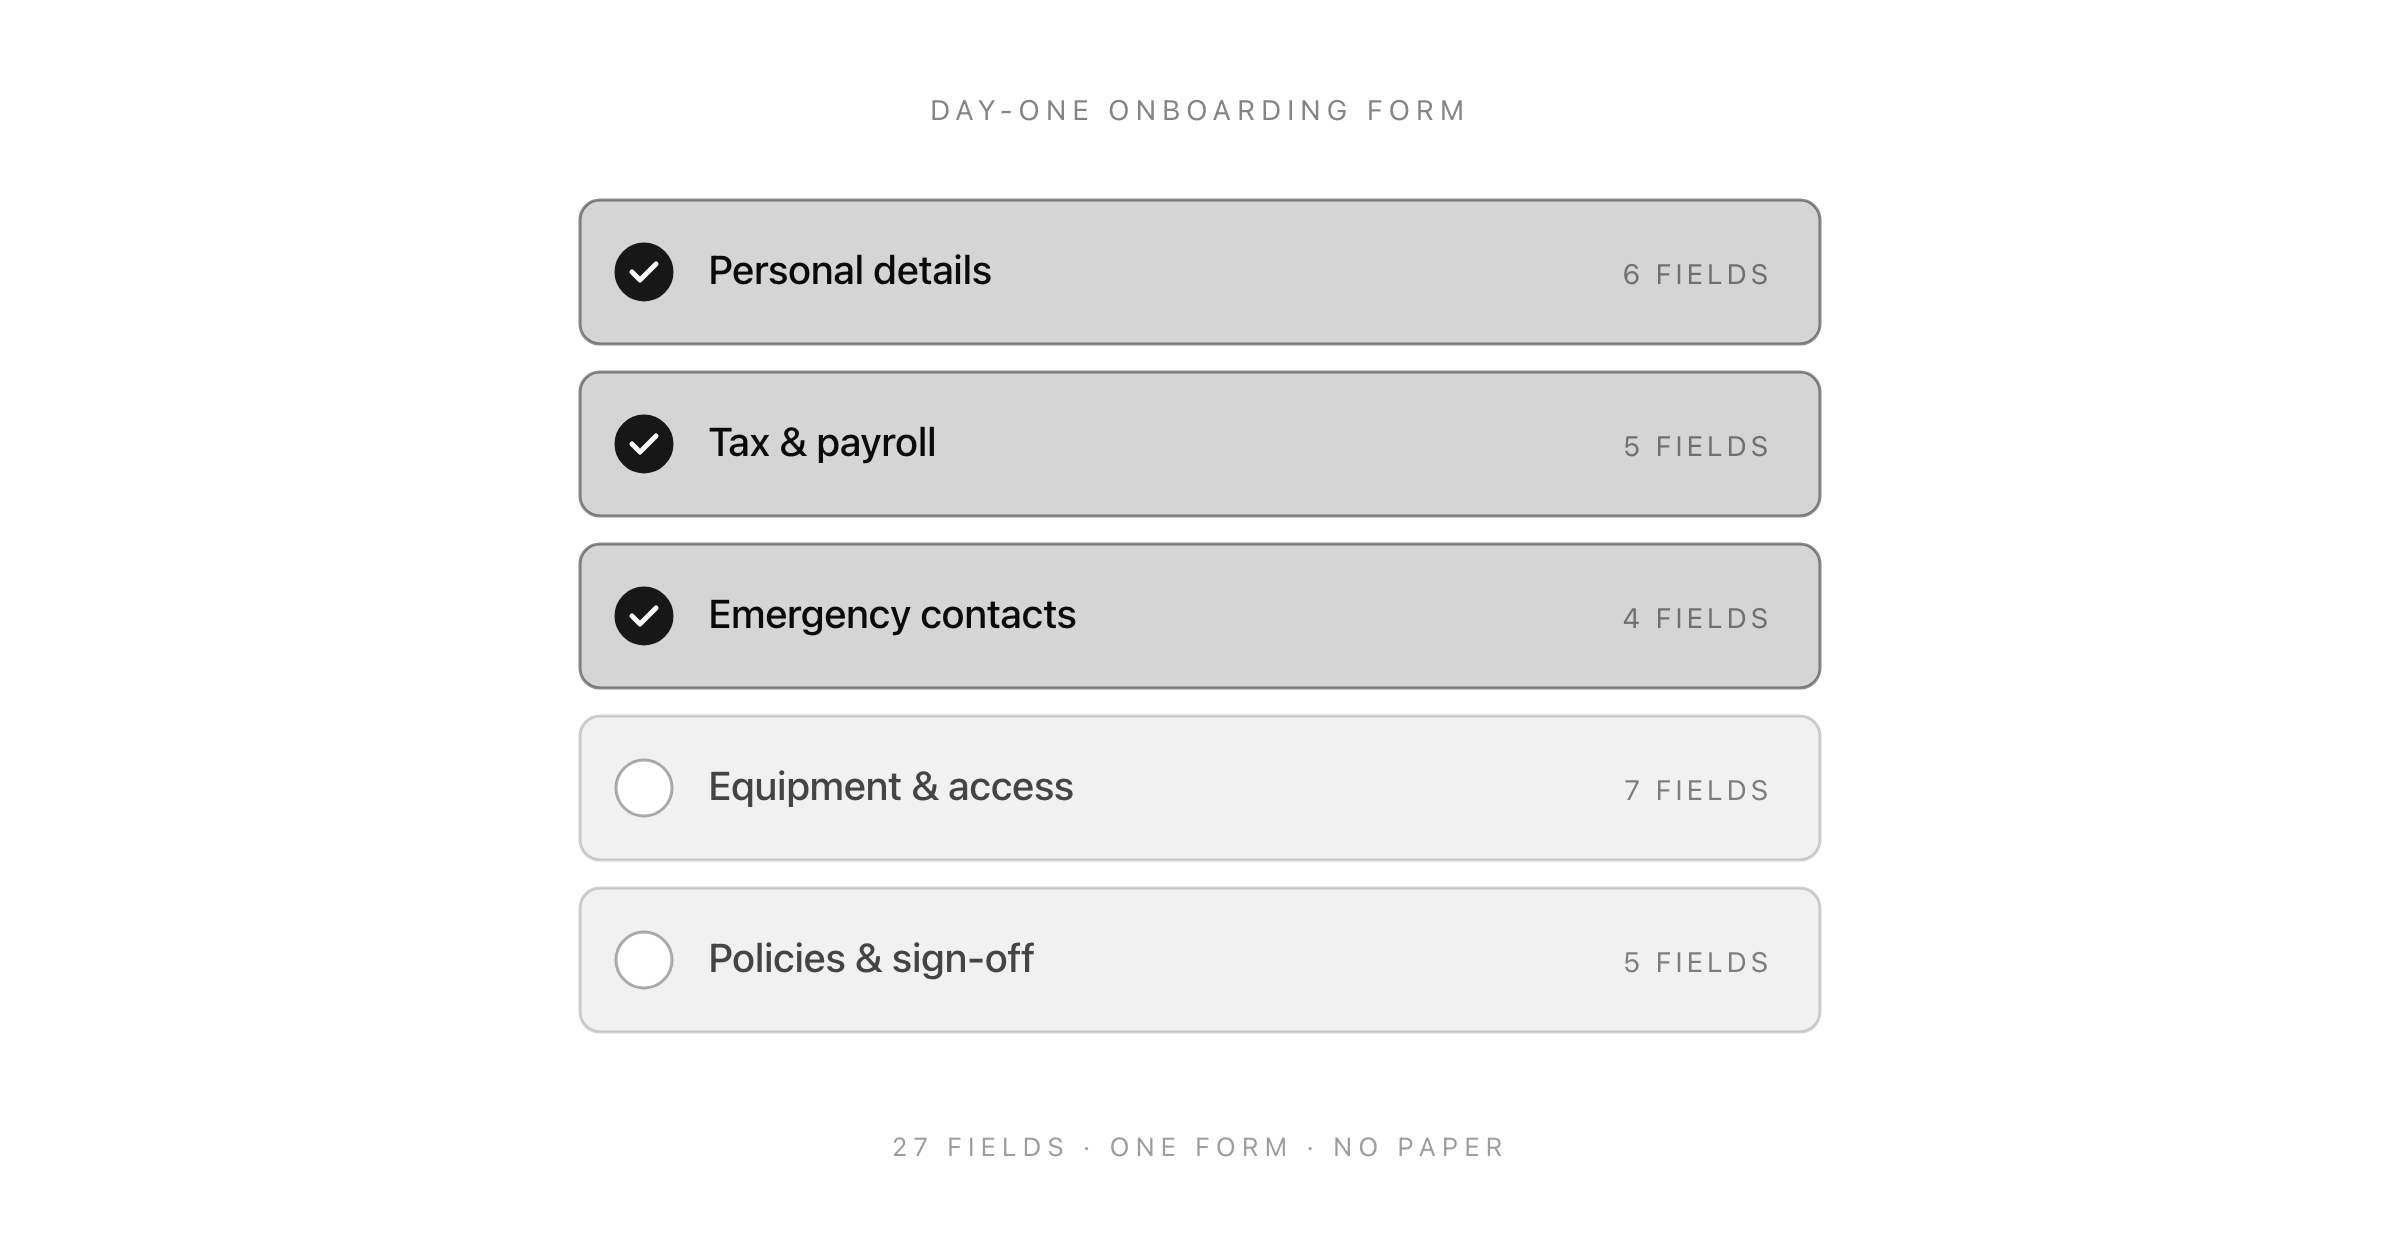
The Five Sections Every Onboarding Paperwork Flow Needs
Regardless of whether you're a five-person startup or a five-hundred-person company, the onboarding paperwork for employees boils down to five sections. Keep them in this order. The progression matters, because each section builds trust for the next.
- Personal details: identity, contact, legal name, right-to-work basics.
- Tax and payroll: enough for payroll to run the first cycle.
- Emergency contacts: one primary, one backup.
- Equipment and access: what they need on day one, logistics for IT.
- Policies and sign-off: acknowledgement of code of conduct, handbook, and any role-specific policies.
Everything else ("favourite snack", "Slack handle", "profile photo") belongs in a separate, optional post-hire form. Keep the required form tight. Mixing mandatory and fun-to-have in one form kills completion rates.
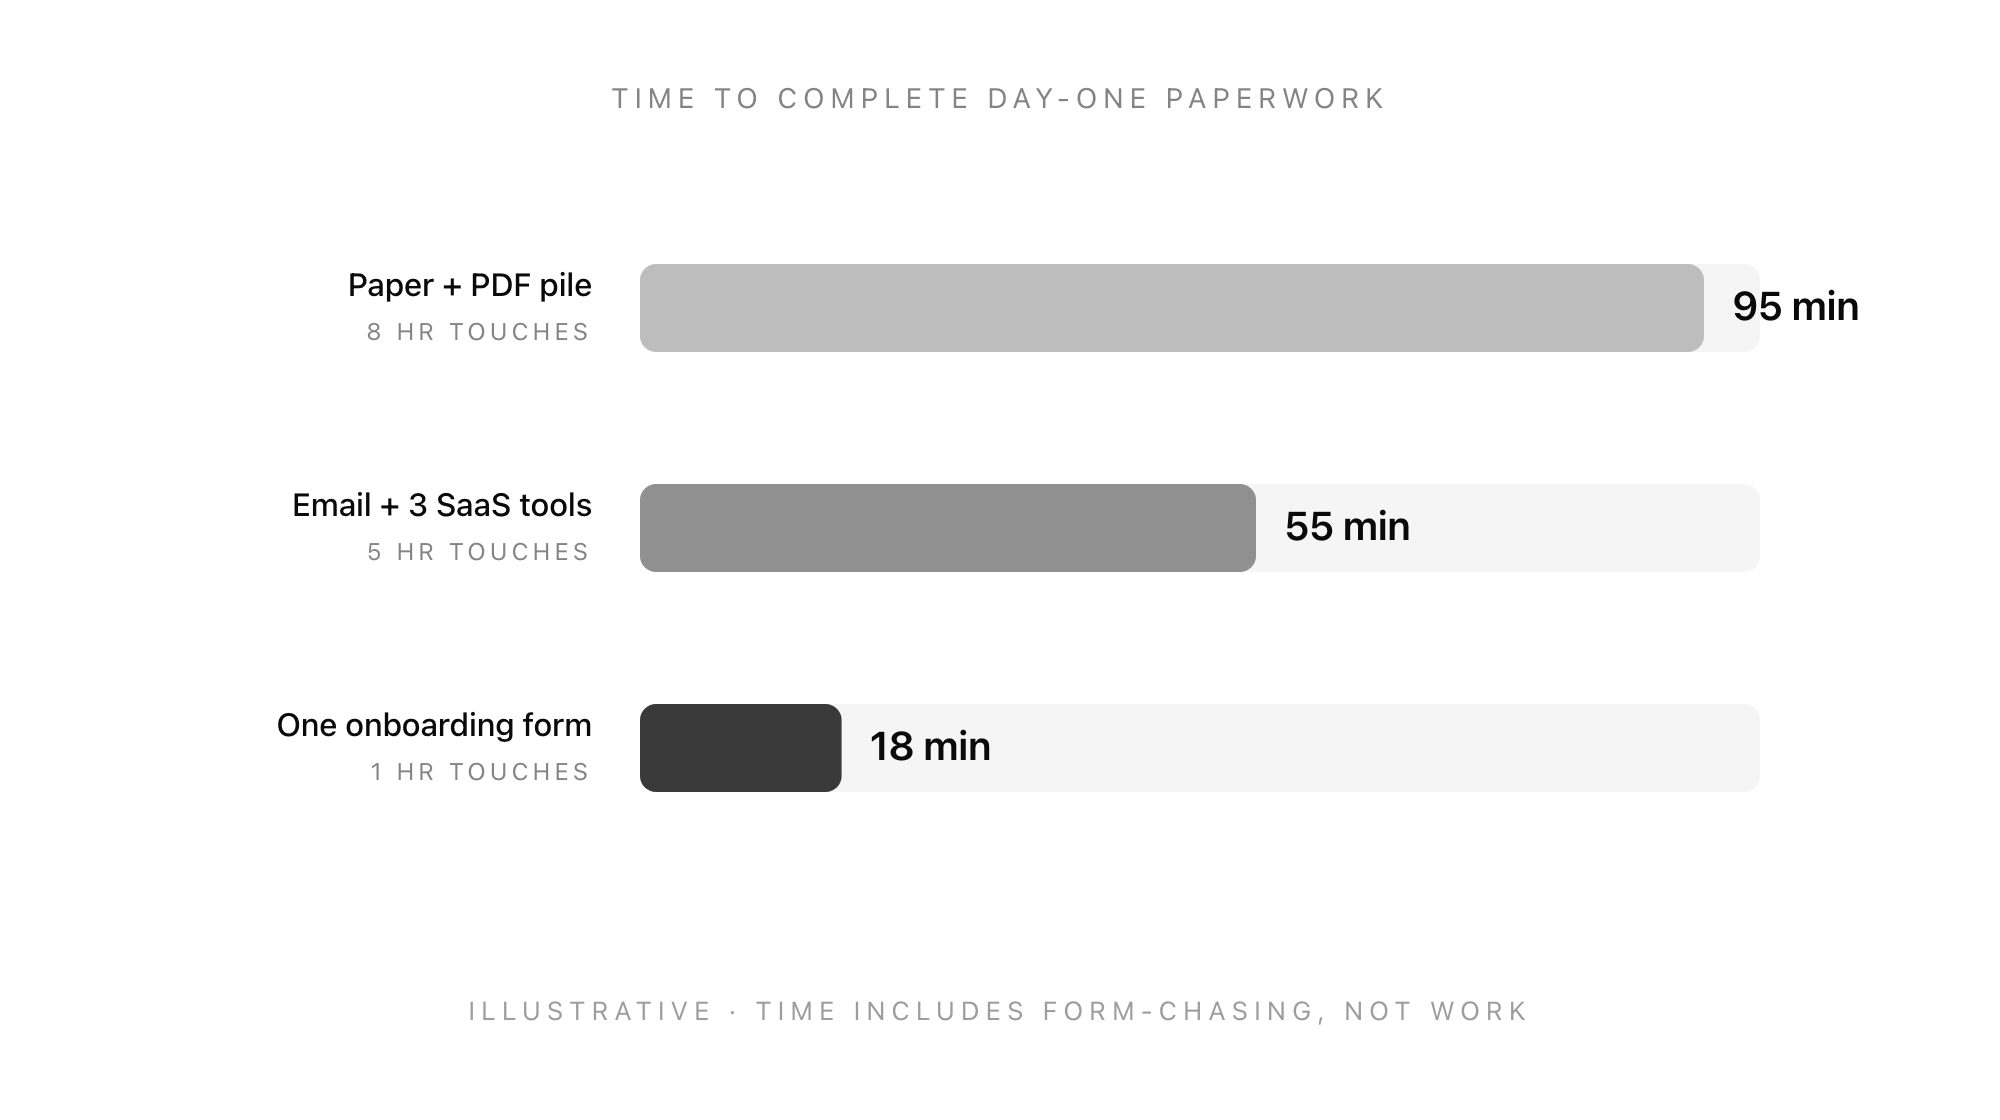
The illustration above is directional, not a formal study, but the ratios match what most small HR teams report: a single consolidated form cuts new-hire admin time to roughly a fifth and eliminates almost all the internal hand-offs.
Section 1: Personal Details (6 Fields)
The bare minimum HR needs to create a personnel record and run a right-to-work check.
- Legal full name (as it appears on government ID). Not preferred name. Preferred name goes in its own field.
- Preferred name (optional, shown everywhere internally).
- Date of birth. Required for tax and benefits in most jurisdictions.
- Home address. Required for tax residency, benefits, and contract of employment.
- Personal email and mobile phone. Your HR system needs a way to reach them that isn't their work email, especially during transitions.
- Right-to-work document upload. Passport or equivalent ID. Flag this as "we will verify in person on day one" so the new hire knows the upload is not the full check.
What to Skip in Personal Details
- National insurance number, SSN, or tax ID: collect these in the tax and payroll section, not here. Keeping sensitive identifiers separate from general profile data makes data-handling cleaner.
- Gender or marital status: only collect if you have a specific, declared reason (benefits enrolment, equal-opportunities reporting). Don't collect by default.
- Photo: optional, not day-one.
Section 2: Tax and Payroll (5 Fields)
This is the section where most onboarding forms bloat. Resist. Payroll needs surprisingly little to run the first cycle.
- Tax identifier. National Insurance number (UK), Social Security number (US), or equivalent. Clearly labelled per jurisdiction.
- Bank account details for salary payment: account holder name, sort code and account number (UK) or routing and account number (US), bank name.
- Starter declaration or W-4 equivalent. One radio-button selection covers most cases (P45 statement A/B/C in the UK; filing status and allowances in the US). Let payroll process the rest.
- Student loan status (if jurisdictional). UK: plan 1/2/4/5 or none. US: not typically collected here.
- Pension auto-enrolment opt-in or opt-out (UK) / retirement plan enrolment (US). Default to enrol. Make the opt-out explicit, not the default.
The One Mistake Almost Every Form Makes
Forms that ask for a photo of a voided cheque or a PDF of the bank statement add friction and fail 1-in-4 uploads. Digital banks don't issue cheques. Ask for the account details directly and have payroll validate through the first micro-deposit or through your payroll provider's built-in verification.
Section 3: Emergency Contacts (4 Fields)
Short, obvious, and still forgotten by an embarrassing number of companies until someone has a crisis on day three.
- Primary contact name and relationship (spouse, parent, friend, partner).
- Primary contact phone number (mobile preferred).
- Secondary contact name and relationship (optional but strongly encouraged).
- Secondary contact phone number.
That's it. Don't ask for addresses, don't ask for emails, don't ask for their employer. Name, number, relationship, primary and secondary. Anything more is a privacy burden you'll regret in an audit.
Section 4: Equipment and Access (7 Fields)
This is the section that single-handedly justifies collapsing onboarding paperwork into one form. Most companies run this as a separate IT ticket that gets raised on day one, by which point the new hire is already sitting at an empty desk.
Capture it here, three days early, and IT can provision asynchronously.
- Laptop preference. Mac, Windows, Linux, or "whichever the team uses". Default to whichever your engineering standard is; give a choice only if you genuinely support both.
- Monitor and peripherals. External monitor (yes/no), keyboard preference, mouse or trackpad. Skip for fully remote roles where the new hire supplies their own.
- Shirt size for company swag (optional, but if you're sending a welcome pack, capture it here, not in a separate Slack DM).
- Dietary requirements for team lunches and offsites. One free-text field. Don't enumerate; people will surprise you.
- Work-from-home setup confirmation for remote or hybrid roles. Stable internet, dedicated workspace, any accommodations they need.
- Access requirements. Systems they need on day one: email, Slack, GitHub, design tools, payroll portal. Let the new hire check boxes; IT provisions in one batch.
- T-shirt over hoodie? (Optional, only if you're actually sending swag.)
Section 5: Policies and Sign-off (5 Fields)
The section most forms get wrong. A single "I have read and agree to the employee handbook" checkbox is close to meaningless if something is ever disputed. Split the acknowledgements.
- Contract of employment. Separate from the onboarding form, ideally signed via a dedicated e-signature tool. Reference it here: "I confirm I have signed my contract of employment on [date]."
- Employee handbook acknowledgement. Separate checkbox. "I have read the employee handbook." Link to the specific version date.
- Code of conduct acknowledgement. Separate checkbox. Link to the current version.
- Data protection and IT acceptable-use policy. Separate checkbox. This is the one most likely to be enforced in a disciplinary; give it its own line.
- Electronic signature and date. Typed full name, plus an automatic timestamp. Not a drawn signature, which most people fake on a trackpad anyway.
Why Separate Checkboxes Matter
If six months later you need to demonstrate that an employee acknowledged a specific policy (a non-solicit clause, a data-handling rule, a social-media policy), a single combined checkbox is a soft signature. Separate acknowledgements are individually defensible. Forms that try to minimise friction by combining them create liability.
The rule of thumb: one checkbox per enforceable policy.
The Full Onboarding Form Checklist (Copy This)
Here's the complete employee onboarding form as a flat checklist you can take into any form builder or to your HR system.
Personal details
- Legal full name
- Preferred name (optional)
- Date of birth
- Home address
- Personal email and mobile
- Right-to-work document upload
Tax and payroll
- Tax identifier (NI / SSN)
- Bank account details
- Starter declaration / W-4 equivalent
- Student loan status (if applicable)
- Pension / retirement plan enrolment
Emergency contacts
- Primary contact name, relationship, phone
- Secondary contact name, relationship, phone
Equipment and access
- Laptop preference
- Monitor and peripherals
- Shirt size (optional)
- Dietary requirements
- Work-from-home setup
- Day-one system access list
Policies and sign-off
- Contract of employment confirmed
- Employee handbook acknowledged (separate)
- Code of conduct acknowledged (separate)
- Data and IT acceptable-use acknowledged (separate)
- Electronic signature and date
Twenty-seven fields, one form, sent five business days before start. That's the whole shape.
When to Send the Form (and How to Phrase It)
Timing matters more than most HR teams realise. Send too early and the new hire forgets. Send too late and IT can't provision in time.
The window that works: five business days before start. The email reads roughly like this:
Hi [name],
Looking forward to your first day on [date]. To keep day one easy, could you spend fifteen minutes filling in the attached onboarding form before you arrive? It covers everything we need for payroll, IT, and HR, so you don't have to do paperwork on your first day.
If anything on there is unclear or you don't have a document to hand, just leave it blank and we'll sort it on arrival.
[Form link]
Three things to notice about that message:
- It names the time cost. Fifteen minutes is honest and low-friction.
- It gives permission to skip. Blank fields are fine. This dramatically increases completion rate because it removes the "I don't have my P45 yet" anxiety.
- It explains the benefit. "So you don't have to do paperwork on your first day" is concrete value. Generic "please complete before start" emails get ignored.
Common Mistakes That Break Onboarding Forms
A short field guide, drawn from what we see when companies send us their existing onboarding paperwork and ask us to rebuild it.
- One enormous multi-page PDF. Fillable PDFs feel like digital forms. They aren't. Completion rates are half what they are for a proper web form, and half the data gets re-keyed by HR anyway.
- Required fields the new hire can't answer yet. Typical offender: "your employee ID". They don't have one. Make internal-only fields non-required and auto-populate them after submission.
- Asking for data you already have. The new hire's name, start date, and role are on the contract. Don't ask them to re-enter. Pre-fill where you can.
- No save-and-return. If the form takes more than ten minutes and has document uploads, people will start it, get interrupted, and lose everything. Use a form tool that supports save-and-return.
- Collecting sensitive data over email. Tax IDs and bank details should never travel in an email thread. A proper form with encryption-at-rest handles this correctly.
- Treating the form as the whole process. The form captures data. You still verify right-to-work in person on day one, still hand over a signed contract, still walk them through the handbook. The form is the skeleton, not the body.
Internal Links
If you're working through the whole hiring funnel, not just onboarding, the logical reads next are:
- The job application form template for the stage before the offer.
- The interview feedback form for the middle of the process.
- Exit interview questions that actually reveal why people leave for the other end of the employee lifecycle.
The Good Form Onboarding Template
The whole twenty-seven-field form, structured exactly as laid out above, is available as a clonable template in Good Form. You get:
- The five sections, in order, with page breaks between them so the new hire can save and return.
- Pre-configured file uploads for right-to-work ID, with sensible size and format limits.
- Separate checkboxes for each policy acknowledgement, each with a version-dated link.
- Conditional logic: UK-specific fields show only for UK new hires, US-specific fields show only for US new hires.
- Encrypted storage and a single-click export to CSV for your HRIS.
Clone it in under five minutes: Good Form onboarding template.
If you already use a free form builder for recruiting, you can point Good Form at the same workspace and keep your application-stage and onboarding-stage forms in one place.
FAQ
What should an employee onboarding form include?
At minimum: personal details, tax and payroll, emergency contacts, equipment and access, and policy acknowledgements. Twenty-five to thirty fields total. Anything longer is usually padding.
Is an onboarding form the same as an employment contract?
No. The onboarding form captures the operational data needed to set up payroll, IT, and HR records. The contract is a separate legal document that should be signed via e-signature before the start date. The form acknowledges that the contract exists; it doesn't replace it.
Can I use a Google Form or Microsoft Form for onboarding?
For a small team, yes, with caveats. Neither tool handles sensitive data (tax IDs, bank details) with the encryption-at-rest and audit logging that a proper HR form needs. For anything over ten hires a year, move to a tool that supports compliant storage.
How long should the onboarding form take to complete?
Target fifteen to twenty minutes. If it's taking new hires forty-five minutes, you're asking for data you don't need or the form is badly built.
When should we send the onboarding form?
Five business days before the start date. This gives IT enough time to provision equipment and gives the new hire enough time to complete it without it feeling rushed.
Ship the Form Today
The employee onboarding form is one of the highest-leverage documents in HR. It directly affects first-day experience, early attrition, compliance posture, and how much of your HR team's time gets eaten by day-one chaos. Building a good one is not hard; it just requires treating the form as an async tool, not a compliance receipt.
Clone the Good Form onboarding template and you'll have a live, shareable form for your next new hire inside five minutes. If you want to see the rest of the forms Good Form ships with (application, interview feedback, exit survey), browse the full template library.